HDL Dump Helper GUI Help
Contents:
1. Howto install a game
2. Howto add a game to the job list
3. Howto get the game list
4. The job list
5. The settings
6. hdl_dump versions
7. Howto create a language file
8. FAQ
You can also use the helpful tool tips for help.
They will be shown if you stay for a little time with the cursor on an object.
1. Howto install a game
The first step to install a game on your ps2 hdd is the target panel.

There you have to choose if you want to install the game on a hdd which is locally connected to your pc or which is connected through the network to your pc (hdl_dump networking server).
Make your choice and enter the IP-Adress of the networking server (start the hdld_srv_0.xx.elf on your ps2, see the files folder) and press the 'Connect' Button or choose a hdd in the box.
Then the program will check the hdd and if all went fine it'll show a progress bar which shows how much free space you have on that hdd and other stuff. If an error message appears then check again if you selected the correct hdl_dump formated hdd or if there is a networking server running on that ip (try ping ).
If the network server was chosen as target then there will also appear a new button with that you can remotely power off the ps2 console using the networking server.

Now choose the 'Install' tab in the 'Action' panel.
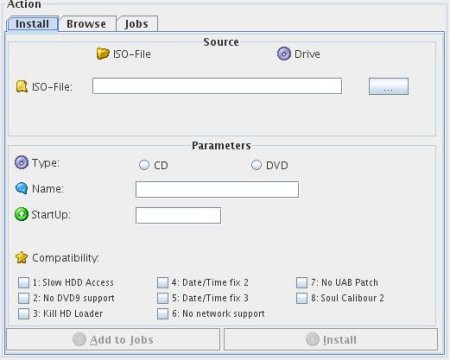
There you first have to choose the source. Make your choice between a 'ISO-File' and a CD/DVD-ROM drive. (btw. DVD9 can only be installed via ISO)
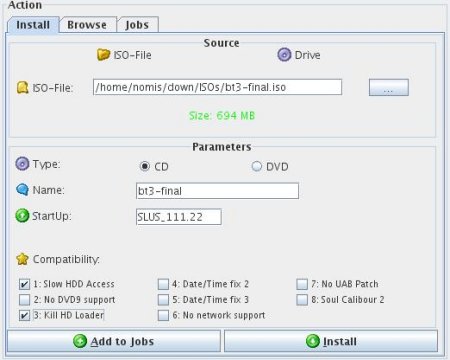
If you have chosen 'ISO-File' which can also be done through the 'View' menu of the menubar then press the '...' button to browse for an ISO-File. After you have chosen an ISO-File the program will automatically set the medium type (CD or DVD), the name and also the StartUp Value if its possible. You can also edit the TextFields manually. The size of the selected source will also be shown to check if its fitting on the target. Now you can set some compatibility switches if the game needs it. Some games need for example Mode 1 and 3, then select 1 and 3. See the compatibility threads in some forums to get to know if your game needs compatibility switches or not. You also can set them later with hdl_dump before you run the game on your ps2.
If all went fine till now then the 'Install' button isn't disabled anymore and you just can click on it to install the game one the target hdd.
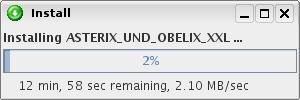
A window will appear which will show the install progress.
Wait until its finished and then you're done! ;)
2. Howto add a job to the job list
To add a job to the job list you have to do the same like installing a game.
The only differents is that you click on 'Add to jobs' at the end instead of clicking on 'Install'. Then the selected game will be added to the job list which can be run later. You can add more games to the list like that. Which makes it easier to install many games at one time.

3. Howto get the game list
To get the game list start with selecting the right target on the target panel (see howto install a game for help).
Now select the 'browse' tab in the 'Action' panel. This can also be done via the menu 'View'.
If you selected the target correctly then the 'Show List' button will be enabled. Click on that button to get the game list.
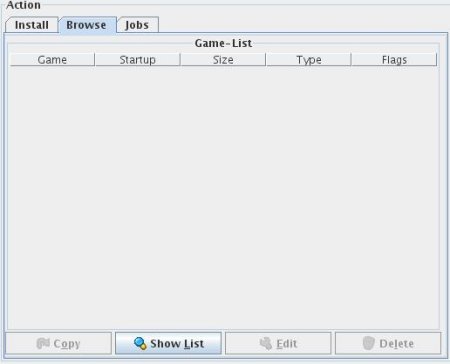
After pressing the 'Show List' button the program will try to get the list of the installed games on that target. If something goes wrong read the error messages or check again the target.
When the list is shown you can edit, delete and copy a selected game. If you want to rename the game then press the 'Edit' button and a little window will appear asking for the new name. If you want to delete a selected game press the 'Delete' button. With the 'Copy' Button you can copy/extract the selected game from the target onto your pc/hdd. If you click that a browse window will appear where you have to choose the destination file. Then you have to choose if you want to copy the game now or if you want to add it to the job list which is very helpful if you want to copy many games on your pchdd.
If anything wents wrong check the mostly helpful error messages.


4. The job list
If you want to know howto add a game to the joblist see this: 2. Howto add a game to the job list.
The job list is a list which handles many installation processes step by step. So you can add e.g. 5 games to the list and then the program will install them on the target step by step. So it saves more time than doing it yourself step by step through the 'Install' button/tab.
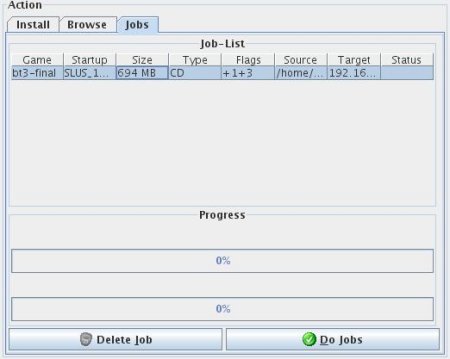
The job list includes all information which you entered in the 'Install' tab before adding. The last coloumn shows the installation status of the game. There you will see if everything went fine with the installtion after having pressed the 'Do Jobs' button. You also can remove a job from that list by pressing the 'Delete Job' button.
The single and the total progress will be shown with the progressbars of the 'Progress' panel.
There's also the possibility to add copy actions to the game list.
5. The settings
To access the settings press on the 'Edit' menu and choose 'Settings'. You can also use the shortcut CTRL+P.

After pressing the 'Settings' menuitem the settings frame will appear.
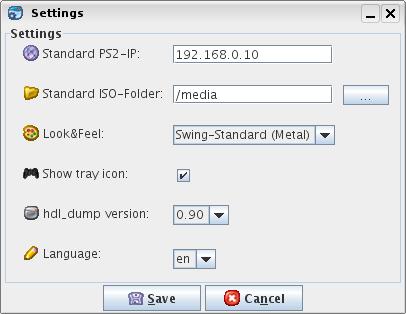
There you can edit the settings. The first option is the standard ps2 ip. If you enter an ip there then it will automatically be put in the ip TextField which you can find on the target panel. So you don't have to enter your networking server ip everytime.
The second option is the 'Standard ISO-Folder'. There you can choose a folder by pressing the '...' button which will be opened first when you browse for an iso file. If there is a last-opened-folder available (e.g. if you already chose another iso) then that folder will be opened otherwise the standard folder will be opened if it is set.
The next option ist the look and feel option. There you can choose the look/design of the program. There are 4 Designs available:
- Swing-Standard (Metal)
- Kunststoff
- PGS
- Java-GTK (linux only) or
Java-Windows (windows only)
(To get more informations about the look and feels see the linceses.txt file)
The next Checkbox disables or enables the TrayIcon. So, if you don't like the TrayIcon and/or the possibility to minimize the program to the tray then you can disable it. (Default: Enabled)
At the next ComboBox you can choose the hdl_dump version which should be used. To get more informations about the different version see this: 6. hdl_dump versions.
The last option is the language. There you can set your languag (de & en at the moment). The language files can be found in the files/lang/ folder (if you want to create your own: 7. Howto create a language file).
To save the settings press the 'Save' button. Then the settings will be saved to files/properties.conf. Please don't edit the file by your own. Use the settings frame to avoid errors!

If anything goes wrong when saving the properties then check the write permissions on that file and check if the files/ folder exists.
The settings will completely take effect after a restart of the program!
6. hdl_dump versions
With this GUI I include 2 version of the hdl_dump command line program: 0.86 and 0.90.

You can switch between them using the 'Settings' frame. The newer version (0.90) is faster when you use it to install a a game on a network target (~3 MB/s instead of ~2,1 MB/s) or when you extract a game from a network target onto your pc (~3,10 MB/s instead of ~1,2 MB/s) but it also needs another server elf file. In the files/ folder you can find the server files for the 0.86 and 0.90 version and also both hdl_dump versions. The 0.90 server often has problems because that one is only UDP based. So if you have problems than check your firewall, UDP incoming port 12345 needs to be open.
There's also another problem with the 0.90 networking server. It doesn't seem to implement the standard networking modules. Therfore you first have to run ULaunchELF. There goto MISC and run PS2NET to setup network. Then launch hdld_svr_090.elf via ULaunchELF.
Because of these problems I set the 0.86 version to use as default, because it doesn't have such problems. The server 0.86 file can just be launched however you want. There's no need to enable networking first.
If you change the currently used version then make sure that you use the corressponding networking server. And if you get any error message then check again if you are using the right server file!
There's no big difference between the 2 versions when installing a game on a locally connected target.
So, if you mostly install games on a locally connected target and you dont mind a little less speed but higher compatibility then choose the old server (0.86). If you often install games on a network target and you want the highest speed then choose the newer version (0.90). If you only get errors whileusing the newer version (0.90) then switch back to the older version (0.86).
7. Howto create a language file
To create a new language file open the files/lang/ folder. There you should see 2 folders. The 'en' and the 'de' folder. Create e.g. anew folder called 'fr'(only 2 characters are allowed) to create a french translation. Now switch to the 'de' or 'en' folder and copy the 3 files which you find there into the 'fr' folder. Now you can start your translation by editing the files in the 'fr' folder. If everything was done correctly then the language will be display in the settings frame.
If you have finished a good translationthen it would be nice if you can send it anyhow to me that I can include it in the download package.
8. FAQ
1. Can I use this program for free?
Yes, it's totally for free! ;)
2. I really like the icons. Where do i get them?
See the licenese.txt file for more informations about the IconSet.
3. I can not run the program. What am I doing wrong?
To run the program the Java Runtime Environment (JRE) in the latest version has to be installed because this program is coded in Java.
To run the program on a windows pc you can use the exe file. Doubleclicking the jar file should also work if the JRE is installed correctly.
To run the program on a linux pc you can double click the 'launcher-linux.sh' file (make sure its runnable -> chmod +x). You also can run this command: 'java -jar de.hdld.gui.HdlDHGui.jar' (make sure you changed in the folder containing the jar file).
4. I really like the look and feels and i want to use them in my own program.
See the licenses.txt file for more informations about the look and feels. You can find the L&F packages in the lib/ folder.
5. What can I do with this program?
With the HDL Dump Helper GUI you can manage your ps2 hdd based on the command line program hdl_dump. You can install a game from an ISO-File or a CD/DVD-ROM drive onto your HD Loader formated ps2 hdd using a networking server or a locally connected hdd (IDE/USB). You can also see the list of the currently installed games and edit them. Deleting and copying a game onto your pc is possible too. That are the main functions. To use a hdd in your ps2 you will need a network adapter with a compatible hdd. You also have to be able to run HD Loader on your ps2 (you need a hdl disc or a modchip etc.).
6. I've found a bug or i have some suggestions!
If you've found a bug or you have some suggestions to improve this program then feel free to contact me via e-mail (nomis-s@gmx.de) or use the official release thread http://www.modcontrol.com/Board/thread.php?threadid=6494 (german only).
7. What about the desk_icon.png file in the /files folder?
Thats an icon which can be used to create a desktop shortcut for this program.
8. What are the compatible Operating Systems (OS)?
Basically it should run an any OS with the JRE installed. Depending on the hdl_dump command line program it should run on any Windows and Linux OS. I personally tested Windows XP/2000 and SuSE Linux, Kubuntu, Sidux. Some Users confirmed that it also works fine on Windows Vista.


